Automated Cycle 2: Freeze-Drying Strawberries, Kiwis, Oranges, and Bananas
Bananas and apples typically dry exceptionally well in our standard automated cycle—no adjustments necessary. Today, however, we're expanding our fruit repertoire to include strawberries, kiwis, oranges, and bananas, which also perform well under our preset conditions.
While our simplest cycles often do not require a temperature probe, today we'll use one to monitor the temperature of the fruits. However, we will not activate the ‘Probe in use’ mode, meaning the probe’s readings will not influence the drying process. Instead, it will simply help us understand the exact temperatures the food reached during drying. It is recommended not to use ‘Probe in use’ mode for fruit slices because the probe, when inserted into a random slice, may not accurately represent the slice that is most difficult to dry. Moreover, since the slices are thin, there's a risk of the probe popping out, potentially leading to a very very long drying process ( because the freeze dryer think the food is not done...). Therefore, it’s advisable to avoid using the ‘Probe in use’ mode for fruit slices. However, this mode is particularly important for liquids or pastes, where internal temperatures are critical.

Today's session uses fresh fruit. You can also use purchased frozen fruit or pre-freeze your sliced fresh fruit to significantly reduce the time required for the freezing stage. Simply select the 'Frozen Food' button on the freeze dryer’s control screen; the machine will automatically adjust its settings.
Let's get started:
1. Prepare Your Fruit:
- Clean and slice your fruit thinly, ideally less than 1/2 inches thick, to drying efficiently. Pay special attention to oranges ( all kinds of citrus...), they require thinner slices because the membranes.
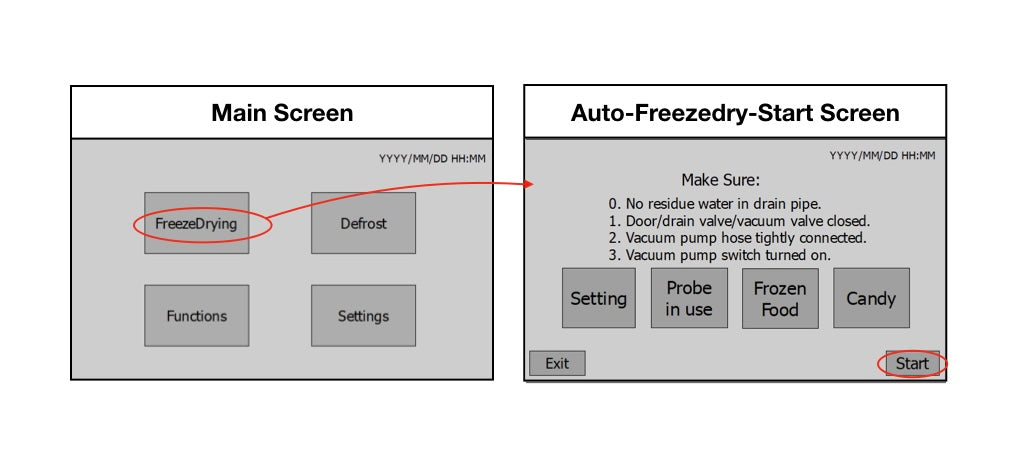
2. Load the Freeze Dryer:
- Place the loaded tray on the shelf inside the chamber.

- Close the acrylic door, and make sure both the pump valve and drain valve are closed.

3. Start the Freeze-Drying Process:
- From the main screen, select the 'Freeze Drying' button, then press 'Start'. The freeze dryer will automatically progress through the drying process.
4. Pause During Final Dry If Needed:
- The final dry stage lasts 7 hours by default. If you suspect your fruits have been dried sufficiently, you can pause the cycle to check.
- It's recommended to decrease the final dry hours by pressing the 'DEC' button on the final dry screen, allowing the freeze dryer to stop automatically. For example, if the remaining time above the 'final dry' button is less than 2 hours, you can decrease the final dry hours by 2, after hit the enter button, the freeze dryer would beep, show 'drying is complete', and then stop the pump.
5. Bag the freeze dried fruits:
- If trays are cold, hit the 'Warm Tray' button to prevent moisture reabsorption before opening the acrylic door.
- Open the vacuum valve to normalize pressure such that you can open the door. You only need to open vacuum valve only in order to open the door. Open the drain valve during the defrost cycle.

- Thoroughly check if the fruits are done. Citrus most of time takes a longer time to dry. Bag them or put them in mason jars quickly, as dried fruits attract moisture fairly quickly.

By following these steps, you'll enjoy perfectly dried fruits that retain their flavors and nutrients, ready for storage or immediate enjoyment!
Leave a comment
Please note, comments must be approved before they are published