Guide to Beginner - Automated Cycle
Have you just completed setting up your freeze dryer and let it sit for 24 hours? Wonderful! Next, we'll guide you through an easy automated cycle for freeze-drying unfrozen food. If you haven’t set up your freeze dryer yet, please click here for setup instructions.
1. Check for Water- Main Chamber: Make sure there’s no ice or water in the chamber and around the door gasket.

- Drain Pipe: Open the drain valve, use a Q-Tip to check for water in the drain pipe. If it's wet, use the air pump to expel the water.

2. Ensure an Airtight Seal

- Close the Valves: Turn the switches of both the vacuum and drain valves to a 90-degree angle with the hose. This step is crucial to create an airtight seal for efficient freeze drying.
3. Prepare and Load Food
- Prepare and arrange your unfrozen food on the trays. Then, place the trays onto the shelves and close the acrylic door securely.

4. Starting the Freeze-Drying Process
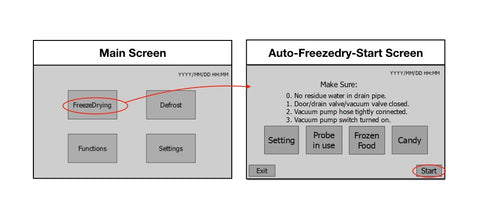

- Navigate to ‘FreezeDrying’ on the touch screen to access the Auto-freezedry-start screen. The settings are pre-configured for unfrozen food, so simply press ‘Start’.
- The freeze dryer will autonomously advance through "Freezing", "Main Drying", and "Final Drying" stages.
5. Finish the Freeze-Drying Process
- Completion Alert: The system will notify you and automatically shut off the vacuum pump once the final drying stage is complete.

- Warm Tray if Necessary: Immediately after freeze drying, the food should be warm to prevent moisture absorption when exposed to air. If the food cools down inside the unit, do not open the door as cold food will quickly absorb moisture from the surrounding air. To prevent this, press 'Warm Tray' button and wait until the shelf temperature reaches the preset maximum (120°F by default) before opening the door.

- Dryness Check: Ensure food is warm, then open the vacuum valve and door to check if the food is completely dry. If not, proceed to step 6 for additional drying. If it's fully dry, your job is done, and you can skip step 6.
6. Post-Drying Completion
- If further drying is needed, replace the trays, then close the door, close all valves, and select ‘Return to FinalDry’. Adjust drying time using ‘INC’ or ‘DEC’, then press ‘Final Drying’ to continue.

- Perform a dryness check after this additional cycle. Place the food back on final dry if necessary.

Your freeze-dried food is now ready to be stored in a sealed container to prevent moisture absorption.
Leave a comment
Please note, comments must be approved before they are published